Installation guide — Scrapy 2.5.1 documentation
Supported Python versions
Scrapy requires Python 3. 6+, either the CPython implementation (default) or
the PyPy 7. 2. 0+ implementation (see Alternate Implementations).
Installing Scrapy
If you’re using Anaconda or Miniconda, you can install the package from
the conda-forge channel, which has up-to-date packages for Linux, Windows
and macOS.
To install Scrapy using conda, run:
conda install -c conda-forge scrapy
Alternatively, if you’re already familiar with installation of Python packages,
you can install Scrapy and its dependencies from PyPI with:
We strongly recommend that you install Scrapy in a dedicated virtualenv,
to avoid conflicting with your system packages.
Note that sometimes this may require solving compilation issues for some Scrapy
dependencies depending on your operating system, so be sure to check the
Platform specific installation notes.
For more detailed and platform specifics instructions, as well as
troubleshooting information, read on.
Things that are good to know
Scrapy is written in pure Python and depends on a few key Python packages (among others):
lxml, an efficient XML and HTML parser
parsel, an HTML/XML data extraction library written on top of lxml,
w3lib, a multi-purpose helper for dealing with URLs and web page encodings
twisted, an asynchronous networking framework
cryptography and pyOpenSSL, to deal with various network-level security needs
The minimal versions which Scrapy is tested against are:
Twisted 14. 0
lxml 3. 4
pyOpenSSL 0. 14
Scrapy may work with older versions of these packages
but it is not guaranteed it will continue working
because it’s not being tested against them.
Some of these packages themselves depends on non-Python packages
that might require additional installation steps depending on your platform.
Please check platform-specific guides below.
In case of any trouble related to these dependencies,
please refer to their respective installation instructions:
lxml installation
cryptography installation
Using a virtual environment (recommended)
TL;DR: We recommend installing Scrapy inside a virtual environment
on all platforms.
Python packages can be installed either globally (a. k. a system wide),
or in user-space. We do not recommend installing Scrapy system wide.
Instead, we recommend that you install Scrapy within a so-called
“virtual environment” (venv).
Virtual environments allow you to not conflict with already-installed Python
system packages (which could break some of your system tools and scripts),
and still install packages normally with pip (without sudo and the likes).
See Virtual Environments and Packages on how to create your virtual environment.
Once you have created a virtual environment, you can install Scrapy inside it with pip,
just like any other Python package.
(See platform-specific guides
below for non-Python dependencies that you may need to install beforehand).
Platform specific installation notes
Windows
Though it’s possible to install Scrapy on Windows using pip, we recommend you
to install Anaconda or Miniconda and use the package from the
conda-forge channel, which will avoid most installation issues.
Once you’ve installed Anaconda or Miniconda, install Scrapy with:
To install Scrapy on Windows using pip:
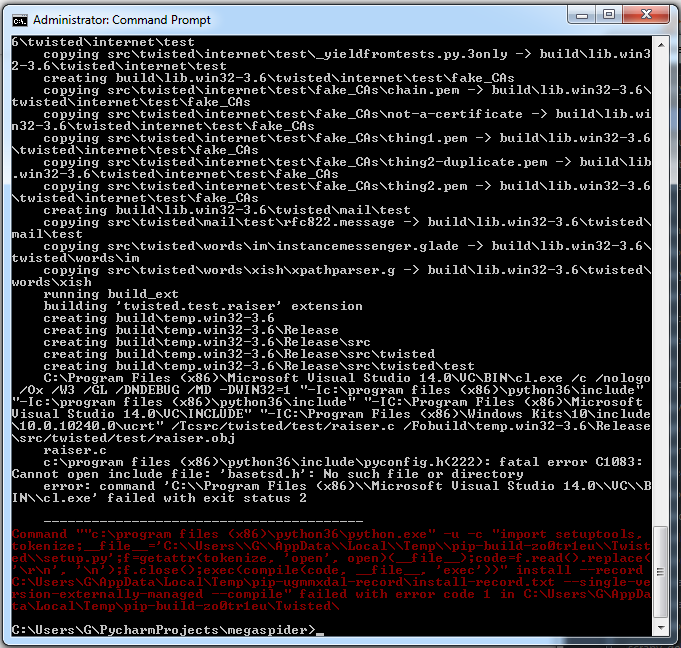
Warning
This installation method requires “Microsoft Visual C++” for installing some
Scrapy dependencies, which demands significantly more disk space than Anaconda.
Download and execute Microsoft C++ Build Tools to install the Visual Studio Installer.
Run the Visual Studio Installer.
Under the Workloads section, select C++ build tools.
Check the installation details and make sure following packages are selected as optional components:
MSVC (e. g MSVC v142 – VS 2019 C++ x64/x86 build tools (v14. 23))
Windows SDK (e. g Windows 10 SDK (10. 0. 18362. 0))
Install the Visual Studio Build Tools.
Now, you should be able to install Scrapy using pip.
Ubuntu 14. 04 or above
Scrapy is currently tested with recent-enough versions of lxml,
twisted and pyOpenSSL, and is compatible with recent Ubuntu distributions.
But it should support older versions of Ubuntu too, like Ubuntu 14. 04,
albeit with potential issues with TLS connections.
Don’t use the python-scrapy package provided by Ubuntu, they are
typically too old and slow to catch up with latest Scrapy.
To install Scrapy on Ubuntu (or Ubuntu-based) systems, you need to install
these dependencies:
sudo apt-get install python3 python3-dev python3-pip libxml2-dev libxslt1-dev zlib1g-dev libffi-dev libssl-dev
python3-dev, zlib1g-dev, libxml2-dev and libxslt1-dev
are required for lxml
libssl-dev and libffi-dev are required for cryptography
Inside a virtualenv,
you can install Scrapy with pip after that:
Note
The same non-Python dependencies can be used to install Scrapy in Debian
Jessie (8. 0) and above.
macOS
Building Scrapy’s dependencies requires the presence of a C compiler and
development headers. On macOS this is typically provided by Apple’s Xcode
development tools. To install the Xcode command line tools open a terminal
window and run:
There’s a known issue that
prevents pip from updating system packages. This has to be addressed to
successfully install Scrapy and its dependencies. Here are some proposed
solutions:
(Recommended) Don’t use system python, install a new, updated version
that doesn’t conflict with the rest of your system. Here’s how to do it using
the homebrew package manager:
Install homebrew following the instructions in Update your PATH variable to state that homebrew packages should be
used before system packages (Change to accordantly
if you’re using zsh as default shell):
echo “export PATH=/usr/local/bin:/usr/local/sbin:$PATH” >> ~/
Reload to ensure the changes have taken place:
Install python:
Latest versions of python have pip bundled with them so you won’t need
to install it separately. If this is not the case, upgrade python:
brew update; brew upgrade python
(Optional) Install Scrapy inside a Python virtual environment.
This method is a workaround for the above macOS issue, but it’s an overall
good practice for managing dependencies and can complement the first method.
After any of these workarounds you should be able to install Scrapy:
PyPy
We recommend using the latest PyPy version. The version tested is 5. 9. 0.
For PyPy3, only Linux installation was tested.
Most Scrapy dependencies now have binary wheels for CPython, but not for PyPy.
This means that these dependencies will be built during installation.
On macOS, you are likely to face an issue with building Cryptography dependency,
solution to this problem is described
here,
that is to brew install openssl and then export the flags that this command
recommends (only needed when installing Scrapy). Installing on Linux has no special
issues besides installing build dependencies.
Installing Scrapy with PyPy on Windows is not tested.
You can check that Scrapy is installed correctly by running scrapy bench.
If this command gives errors such as
TypeError:… got 2 unexpected keyword arguments, this means
that setuptools was unable to pick up one PyPy-specific dependency.
To fix this issue, run pip install ‘PyPyDispatcher>=2. 1. 0’.
Troubleshooting
AttributeError: ‘module’ object has no attribute ‘OP_NO_TLSv1_1’
After you install or upgrade Scrapy, Twisted or pyOpenSSL, you may get an
exception with the following traceback:
[…]
File “[…]/site-packages/twisted/protocols/”, line 63, in
from ternet. _sslverify import _setAcceptableProtocols
File “[…]/site-packages/twisted/internet/”, line 38, in
Sv1_1: SSL. OP_NO_TLSv1_1,
AttributeError: ‘module’ object has no attribute ‘OP_NO_TLSv1_1’
The reason you get this exception is that your system or virtual environment
has a version of pyOpenSSL that your version of Twisted does not support.
To install a version of pyOpenSSL that your version of Twisted supports,
reinstall Twisted with the tls extra option:
For details, see Issue #2473.

Installation guide — Scrapy 2.5.1 documentation
Supported Python versions
Scrapy requires Python 3. 6+, either the CPython implementation (default) or
the PyPy 7. 2. 0+ implementation (see Alternate Implementations).
Installing Scrapy
If you’re using Anaconda or Miniconda, you can install the package from
the conda-forge channel, which has up-to-date packages for Linux, Windows
and macOS.
To install Scrapy using conda, run:
conda install -c conda-forge scrapy
Alternatively, if you’re already familiar with installation of Python packages,
you can install Scrapy and its dependencies from PyPI with:
We strongly recommend that you install Scrapy in a dedicated virtualenv,
to avoid conflicting with your system packages.
Note that sometimes this may require solving compilation issues for some Scrapy
dependencies depending on your operating system, so be sure to check the
Platform specific installation notes.
For more detailed and platform specifics instructions, as well as
troubleshooting information, read on.
Things that are good to know
Scrapy is written in pure Python and depends on a few key Python packages (among others):
lxml, an efficient XML and HTML parser
parsel, an HTML/XML data extraction library written on top of lxml,
w3lib, a multi-purpose helper for dealing with URLs and web page encodings
twisted, an asynchronous networking framework
cryptography and pyOpenSSL, to deal with various network-level security needs
The minimal versions which Scrapy is tested against are:
Twisted 14. 0
lxml 3. 4
pyOpenSSL 0. 14
Scrapy may work with older versions of these packages
but it is not guaranteed it will continue working
because it’s not being tested against them.
Some of these packages themselves depends on non-Python packages
that might require additional installation steps depending on your platform.
Please check platform-specific guides below.
In case of any trouble related to these dependencies,
please refer to their respective installation instructions:
lxml installation
cryptography installation
Using a virtual environment (recommended)
TL;DR: We recommend installing Scrapy inside a virtual environment
on all platforms.
Python packages can be installed either globally (a. k. a system wide),
or in user-space. We do not recommend installing Scrapy system wide.
Instead, we recommend that you install Scrapy within a so-called
“virtual environment” (venv).
Virtual environments allow you to not conflict with already-installed Python
system packages (which could break some of your system tools and scripts),
and still install packages normally with pip (without sudo and the likes).
See Virtual Environments and Packages on how to create your virtual environment.
Once you have created a virtual environment, you can install Scrapy inside it with pip,
just like any other Python package.
(See platform-specific guides
below for non-Python dependencies that you may need to install beforehand).
Platform specific installation notes
Windows
Though it’s possible to install Scrapy on Windows using pip, we recommend you
to install Anaconda or Miniconda and use the package from the
conda-forge channel, which will avoid most installation issues.
Once you’ve installed Anaconda or Miniconda, install Scrapy with:
To install Scrapy on Windows using pip:
Warning
This installation method requires “Microsoft Visual C++” for installing some
Scrapy dependencies, which demands significantly more disk space than Anaconda.
Download and execute Microsoft C++ Build Tools to install the Visual Studio Installer.
Run the Visual Studio Installer.
Under the Workloads section, select C++ build tools.
Check the installation details and make sure following packages are selected as optional components:
MSVC (e. g MSVC v142 – VS 2019 C++ x64/x86 build tools (v14. 23))
Windows SDK (e. g Windows 10 SDK (10. 0. 18362. 0))
Install the Visual Studio Build Tools.
Now, you should be able to install Scrapy using pip.
Ubuntu 14. 04 or above
Scrapy is currently tested with recent-enough versions of lxml,
twisted and pyOpenSSL, and is compatible with recent Ubuntu distributions.
But it should support older versions of Ubuntu too, like Ubuntu 14. 04,
albeit with potential issues with TLS connections.
Don’t use the python-scrapy package provided by Ubuntu, they are
typically too old and slow to catch up with latest Scrapy.
To install Scrapy on Ubuntu (or Ubuntu-based) systems, you need to install
these dependencies:
sudo apt-get install python3 python3-dev python3-pip libxml2-dev libxslt1-dev zlib1g-dev libffi-dev libssl-dev
python3-dev, zlib1g-dev, libxml2-dev and libxslt1-dev
are required for lxml
libssl-dev and libffi-dev are required for cryptography
Inside a virtualenv,
you can install Scrapy with pip after that:
Note
The same non-Python dependencies can be used to install Scrapy in Debian
Jessie (8. 0) and above.
macOS
Building Scrapy’s dependencies requires the presence of a C compiler and
development headers. On macOS this is typically provided by Apple’s Xcode
development tools. To install the Xcode command line tools open a terminal
window and run:
There’s a known issue that
prevents pip from updating system packages. This has to be addressed to
successfully install Scrapy and its dependencies. Here are some proposed
solutions:
(Recommended) Don’t use system python, install a new, updated version
that doesn’t conflict with the rest of your system. Here’s how to do it using
the homebrew package manager:
Install homebrew following the instructions in Update your PATH variable to state that homebrew packages should be
used before system packages (Change to accordantly
if you’re using zsh as default shell):
echo “export PATH=/usr/local/bin:/usr/local/sbin:$PATH” >> ~/
Reload to ensure the changes have taken place:
Install python:
Latest versions of python have pip bundled with them so you won’t need
to install it separately. If this is not the case, upgrade python:
brew update; brew upgrade python
(Optional) Install Scrapy inside a Python virtual environment.
This method is a workaround for the above macOS issue, but it’s an overall
good practice for managing dependencies and can complement the first method.
After any of these workarounds you should be able to install Scrapy:
PyPy
We recommend using the latest PyPy version. The version tested is 5. 9. 0.
For PyPy3, only Linux installation was tested.
Most Scrapy dependencies now have binary wheels for CPython, but not for PyPy.
This means that these dependencies will be built during installation.
On macOS, you are likely to face an issue with building Cryptography dependency,
solution to this problem is described
here,
that is to brew install openssl and then export the flags that this command
recommends (only needed when installing Scrapy). Installing on Linux has no special
issues besides installing build dependencies.
Installing Scrapy with PyPy on Windows is not tested.
You can check that Scrapy is installed correctly by running scrapy bench.
If this command gives errors such as
TypeError:… got 2 unexpected keyword arguments, this means
that setuptools was unable to pick up one PyPy-specific dependency.
To fix this issue, run pip install ‘PyPyDispatcher>=2. 1. 0’.
Troubleshooting
AttributeError: ‘module’ object has no attribute ‘OP_NO_TLSv1_1’
After you install or upgrade Scrapy, Twisted or pyOpenSSL, you may get an
exception with the following traceback:
[…]
File “[…]/site-packages/twisted/protocols/”, line 63, in
from ternet. _sslverify import _setAcceptableProtocols
File “[…]/site-packages/twisted/internet/”, line 38, in
Sv1_1: SSL. OP_NO_TLSv1_1,
AttributeError: ‘module’ object has no attribute ‘OP_NO_TLSv1_1’
The reason you get this exception is that your system or virtual environment
has a version of pyOpenSSL that your version of Twisted does not support.
To install a version of pyOpenSSL that your version of Twisted supports,
reinstall Twisted with the tls extra option:
For details, see Issue #2473.

Quick Guide To Install Scrapy to Windows OS | by Admond Lee
Scrapy is an application framework for crawling web sites and extracting structured data which can be used for a wide range of useful applications, like data mining, information processing or historical put it in a more simpler term, Scrapy is used to perform web scraping and web scraping is the process of data extraction from here can be anything ranging from text, images, videos, emails, phone numbers etc…(You get what I mean)Take Google as an example: Everytime when you search something on Google search engine, under the hood it searches and scraps data from the almost the entire websites in the World Wide Web and returns you the search these happened in seconds. Amazing right? I’ve always been wanting to learn web scraping and recently I have a project that requires this technique. Upon the recommendation by my close friend — Low Wei Hong and reading through his article — Scrapy or Selenium?, I started learning it’s fun! In this article, I’ll share with you some simple yet practical guides on how to install Scrapy to Windows OS after struggling with some technicality. At the end of this article, I hope you’d find that helpful before stepping in to learn ’s get started! 1. Create a virtual environmentFirst thing first, it is highly recommended to create a virtual environment and install Scrapy in the virtual environment created. This is to avoid conflict with already-installed Python system packages (which could break some of your system tools and scripts)Conda creates a virtual environmentIn the terminal above, I created a virtual environment named virtualenv_scapy using conda create — name virtualenv_scrapy. Once you’re done with this step, you can use conda to activate the virtual before we move to the next step, it is always a good idea to check which conda environment that you’re currently using by typing conda info –envsConda checks the current environmentGreat. Now that I knew that I was using the original conda environment. We can verify if we have successfully changed to the virtual environment created later by using the same method. 2. Activate the virtual environmentConda activates the virtual environmentTo activate the virtual environment created, you just type conda activate virtualenv_scrapy. And we’ve also checked that we’re now using the virtual next thing to do is to create a new folder, in this case I created a new folder called virtualenv_scrapy and changed my directory to the folder as shown folder created3. Install Scrapy via conda-forge channelThough it’s possible to install Scrapy on Windows using pip, it is recommended to install Anaconda or Miniconda and use the package from the conda-forge channel, which will avoid most installation we already have Anaconda installed, we can directly install Scrapy with the code: conda install -c conda-forge scrapyOnce you’ve typed y to proceed with the installation of all the necessary packages you’ll start downloading and extracting all the packages as below. 4. Use Scrapy to create a new projectBamm! If you’ve reached this stage. Congratulations and you’ve successfully installed Scrapy to your local machine (Windows OS)! And guess what? You can create a new project using Scrapy in no time by typing scrapy startproject demo_project as to this point, you can definitely start playing around with Scrapy. Enjoy and have fun!
Frequently Asked Questions about scrapy windows
Does Scrapy work on Windows?
Windows. Though it’s possible to install Scrapy on Windows using pip, we recommend you to install Anaconda or Miniconda and use the package from the conda-forge channel, which will avoid most installation issues.
How do you use Scrapy on Windows?
How to Install Scrapy to Windows OSCreate a virtual environment. First thing first, it is highly recommended to create a virtual environment and install Scrapy in the virtual environment created. … Activate the virtual environment. … Install Scrapy via conda-forge channel. … Use Scrapy to create a new project.
How do I install pip for Scrapy?
Steps to install Scrapy using pip:Install pip for your operating system if you don’t already have them installed. … Install scrapy package using pip. … Run scrapy using full path. … Add pip installation directory to PATH environment variable. … Start a new terminal session and run scrapy again without specifying full path.